Author: Christian Heilmann
Translated by: Zhuang Qi
Many online conferences don’t have great experiences with live presentations and will ask you to record your talk and send them the video. This might sound intimidating at first, but I’ve been pleasantly surprised by the number of options you have to record and edit your own videos. Almost every slide software has a recording option.
It’s up to you what to use, and you can look around and try things out. For example, I was pleasantly surprised to find that both Powerpoint and Keynote have a recording option. You can add video recordings and voiceovers for each slide right within the program itself. There are also browser extensions that allow you to record anything on your screen.
There are several benefits to recording your talk and sending it to the conference:
-
You can edit out problems and record the talk bit by bit instead of presenting it all at once.
-
You can re-record as much as you want to ensure you hit the right length.
-
During the conference, you can focus on the live chat and see what people are saying—keeping notes is also a good idea.
-
When it comes to the live Q&A that follows almost every online talk, you’ll feel refreshed and ready to tackle these questions without being frustrated by technical hurdles that might have come up earlier.
-
Since you define the quality and accessibility of the video, you can take your time to do a really good job.
Of course, not everything is perfect and rosy.
Speaking to your own camera can feel much harder than speaking to an audience. Audiences are scary too, but at least you get some feedback. Telling jokes to a lens in your own room feels weird, more like acting than speaking. But this shouldn’t dampen your excitement—you should put in more effort to appear passionate, as if you’re talking to an audience, to make a good video. While it sounds silly, I’ve had great results by talking to a fox puppet on my desk. Don’t worry, he doesn’t answer.

I tend to make many versions of videos and am much harsher on myself than I am when on stage. On stage, you have the excuse of pressure—some “ums” and “ahs” or forgetting a detail are forgivable. When you record and deliver a video, it feels different. But again, a little human failure can be left in and will make you more likeable and approachable. We don’t need perfect videos for everything—we need exciting videos where what the person is showing looks repeatable and relatable.
When it comes to watching movies, I also love making-of/behind-the-scenes footage, especially blooper reels. It shows me that humans made the stuff I love, and they had to struggle with all the same problems we do.
Usually, I just record myself walking through slides and some demos, and don’t do a lot of editing for this reason. However, I’ve been doing this for a long time and am comfortable with imperfection. If you’re just starting out, you might want to put in a bit more effort.
Tip: It’s important to remember that any video you publish is a potential gateway to more work. Many conference organizers want to see at least one good video of you before inviting you to speak. This means that any video you publish is a business card. This is also why it’s important to keep your contact information in your slides.
Here are a few things that help me record talks on time and with good quality.
Check Your Setup and Surroundings
Just like when you’re doing a live talk on the internet, it’s important to check your setup and surroundings. Before you record yourself or stream, make sure there’s nothing behind you that could be distracting, confusing, or in the worst case, offensive. While many recording and screen capture tools have virtual backgrounds or blur options, it’s better to just clear everything. To avoid annoying distractions, make sure you turn off any notifications, automatic software updates, and ensure you have some uninterrupted time to record your talk. I tend to set up my own OS and browser profiles for recording to make this easier. Try to avoid dealing with any outside noise and close your door, putting a sign outside indicating that this is an ongoing recording and artistic creation.
Record Your Talk in Segments
The interesting thing about recording a talk is that unless your slides have animations, you don’t actually need to flip through slides while recording the video. You can add each part of the talk as a static image and show it in the video for as long as you need. You can focus on telling your story and let your facial expressions and hand movements show your excitement.
You can also show and hide your video if you don’t want to block the screen, and you can record your talk audio separately. Some conference organizers want this because they need to splice slides and video into their templates.
As explained earlier in this book, this is a great opportunity to show technical demos without long loading pauses or things becoming unresponsive because your computer is also busy recording video and audio. Creating technical demo screen recordings and narrating them afterward is a more reliable way to get a lot of information across in a short time.
Remember to Share the Screen with Your Slides
Since you’re not next to your slides, you’ll have to find a space on the screen to place your video. This often means you need to resize your slides. While you might have a huge screen to record on and feel like there’s enough space, remember that people might be watching the conference on older computers or even mobile devices. It makes sense to be conservative when it comes to how much you can show on screen and how large your font settings should be. I tend to account for this when creating slides, leaving a rectangle on the screen for my face to appear in. You could even make it part of the design.
Use Accessibility Features to Add Extra Video Value
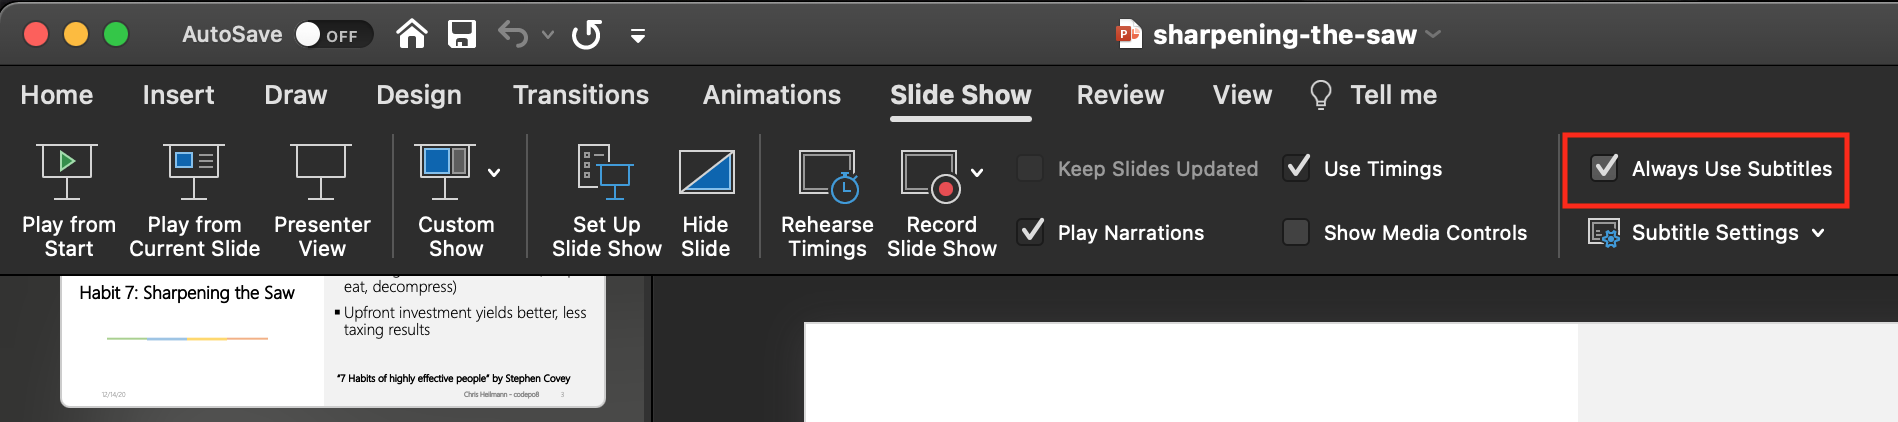
Many slide systems will create automatic captions for what you’re saying. Not every conference has the same capabilities, or the place they store videos might not either. This is why it’s essential to turn on captions on your system when you record your talk. For example, in Powerpoint, this is part of the slide show menu where you simply check the “Always use subtitles” feature.
Record in the Highest Quality Possible
This should be a given, but it’s important to record in the highest quality possible. Of course, this results in huge files, but it gives you the opportunity to edit and fix without needing awkward re-recording and editing. Every video editing tool I know has an export setting that allows you to create a “good enough” version that isn’t multiple gigabytes, but you shouldn’t use that as your material when editing the video. Again, this also means using a good microphone and—if possible, an external camera.
Keep the Original Files, Make Your Videos More Accessible
Most video recording tools will have their own format, which is bulky. Once you’re happy with your video, it’s tempting to delete these files, but I’ve often had conference organizers ask me for last-minute edits and changes, which are much harder to do in an already exported video. External hard drives aren’t expensive, and I’ve taken advantage of several “Cyber Mondays” to buy some specifically for storing my recording original files.
Once you’ve completed your recording and exported it to a suitable file size, you need to get it to the conference organizers. Usually, these will have some place for you to upload, but I find the easiest way to share is with some file sharing service. Box, Dropbox, Microsoft OneDrive, Google Drive, AWS Storage, whatever you want to use—it’s a good idea to invest in one because you don’t want your materials hosted on some sketchy “free” service where you have no say in backups.

Please indicate reprint: Developer Relations »
